|
OpusMSFS
Flight
Simulator Interface for |
|
OpusMSFS_Overview OpusMSFS_User_Guide OpusMSFS_Getting_Started_Single_PC OpusMSFS_Getting_Started_Networked_PCs OpusMSFS_ButtKicker
OpusMSFS
Flight Simulator Interface for MSFS
User Guide

14 Feb 2024
Opus
Software Limited
Email:
opusfsi@opussoftware.co.uk Website:
www.opussoftware.co.uk/opusfsi.htm
Contents
Flight Planning and Navigation Data
GPS
Output (including SkyDemon)
OpusMSFS - Flight Simulator Interface for
MSFS
Thank you for downloading our OpusMSFS
Flight Simulator Interface.
The
OpusMSFS Flight Simulator Interface for Microsoft
MSFS incorporates,
-
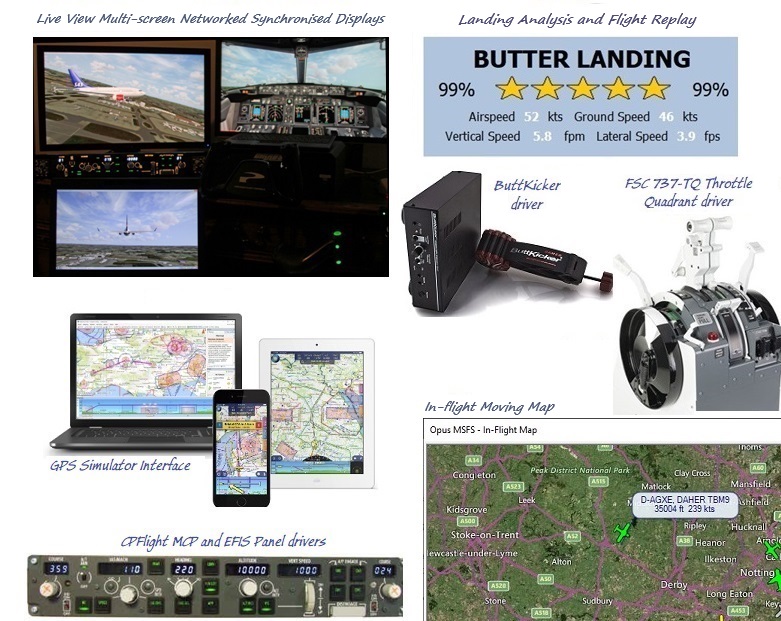
Live View for synchronized views, aircraft status, weather and cloud formations on multi-screen networks allowing one or more client MSFS systems with a MSFS server, or a mixture of client/server sims types using OpusFSI_v6. Ultra high performance IPC communications between networked systems.
-
Flight Planning can be performed with or without the sim running. You can automatically import the current sim flight plan or manually import/create your flight plan with the addition of automatic/manual SID and STAR selection and custom user waypoints. Flight plan points that are suspected to be erroneous are highlighted in red and the Auto Correct Errors option simplifies the removal of all suspect points from the flight plan.
-
Weather Overview/Locator can be used to either locate specific weather conditions on the map area that match your specified criteria, or obtain a Weather Overview of the general weather conditions.
-
In-Flight Moving Map in satellite, terrain, or street map format superimposed with Live Traffic.
-
Landing analysis with Popup window, Spy messages and user logging.
-
Flight Capture and Replay feature which can automatically capture the final approach and landing phase of your flight. Alternatively, you may use the 'Start' and 'Stop' Capture buttons within the dialog to capture any phase of your flight.
-
Shortcut Controls enable you to assign joystick button and keyboard keys to common actions or controls within the SERVER program.
-
GPS Simulator Interface for navigation packages such as SkyDemon® and ForeFlight® GDL90 WIFI (iPad) interface.
-
ButtKicker® Gamer 2 (or similar audio controlled) vibration device interface for added vibrational feedback.
-
FSC 737-TQ Throttle Quadrant (motorised and unmotorised) driver.
-
CPFlight MCP and EFIS (X2) panel support.
The
OpusMSFS
interface is ideally suited for both standalone
(single PC) and networked
(multi-PC/Laptop) systems.
On standalone systems, OpusMSFS incorporates
the in-flight moving map
with traffic, Landing Analysis, Flight
Capture
and
Replay
function,
GPS output, ButtKicker, FSC 737-TQ and
CPFlight interface options.
On networked systems, irrespective of the size and
complexity of your system, whether your system consists of a main 'flying' PC
with a single networked laptop client, or a more elaborate multi-computer
networked system; the Live View interface, with its ultra
high-performance IPC communications, unique Client Side Smoothing
software, and perfect synchronization of aircraft status, weather and cloud
formations, will provide you with the highest possible networking performance.
Whether you simply want an additional controllable display to provide further
scenic or external view options, or wish to create a multi-screened panorama for
your MSFS experience, Live View offers you the ideal hassle
free user-friendly solution.
You
can have a mixture of MSFS, P3D and FSX based server and clients, for MSFS run
OpusMSFS; for P3D/FSX you will have to purchase and run OpusFSI_
v6
(P3D only); or
OpusFSI_v5 (for P3D/FSX).
Your main 'flying'
server is the machine through which you control the aircraft. The networked
client MSFS (or P3D/FSX using OpusFSI_v6/5)
systems are synchronised to the server through multiple
ultra high-performance IPC links, the client systems are used primarily as view
controllers. The networked systems allow you to create a multi-screened
simulator system without placing the full workload and burden on your main
system.
From this set up it therefore follows that all in-cockpit or instrument panel
views used to control the aircraft must be displayed on the main server. All
other views (scenic or external) can be offloaded onto the client systems. You
can create wide panoramic vistas this way, or additional external aircraft
views, without draining the resources on your main system or degrading its
performance.
On networked systems you must install the sim and the OpusMSFS
software on each of your client MSFS computer systems (laptops or PCs), along with
all the scenery and airport addon packages. If you wish to display external
aircraft views on the client computers you will also need to install all
relevant aircraft addons. The OpusMSFS
software does not need to be licensed on the client systems, the purchased
license is only required for your main 'flying' server system. You may either
copy or install the OpusMSFS software
on each of your client systems, the CLIENT
program that you will run on the client computers does not check for any
licensing information. It simply connects to and receives all necessary data
from your main server system.
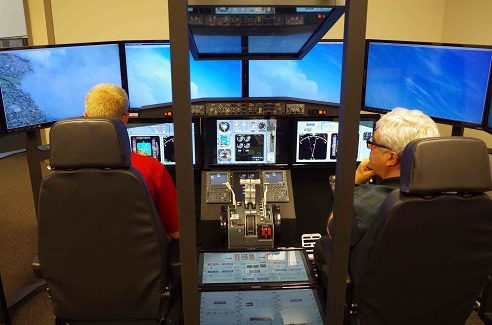
Live View allows you to easily create multi-screen networked displays for your system.
OpusMSFS is fully compatible with Windows (7/8/10/11) operating systems, 64-bit versions. OpusMSFS does not require the Windows Server operating system to create or maintain the local area network links, and different operating systems may be utilized throughout the local area network.

Figure
1
- Live View Multi-Screen Networked Displays
Photo courtesy of the Human-Centered Design Institute, Florida Institute of Technology
System Requirements
Microsoft MSFS simulator.
Windows 10/8/7/XP (64-bit version) operating system.
Microsoft .NET Framework Version 4.8
65 MB hard disk space.
Microsoft.NET
You
need .NET v4.8, and SimConnect to be installed on your server
system (and optional client systems) for OpusMSFS to work.
You can check what versions of .NET you have installed in Control Panel by selecting Settings, System, Apps and features, then search for .NET and a list of installed versions will be displayed. For older operating systems you can check what versions of .NET you have installed by checking your c:\Windows\Microsoft.NET\Framework or Framework64 folders. You should see a v2.0.xxxxx folder in addition to the v4.0.xxxxx folder.
SimConnect
In
the case of SimConnect, first make sure you have installed MSFS, SimConnect is usually
installed automatically with it. If you have mislaid or corrupted your
SimConnect then you can try re-installing it using the SimConnect.msi file
within your c:\OpusMSFS folder.
Software Installation
Please refer to our OpusMSFS_Getting_Started_Single_PC document located in the OpusMSFS install folder, also available from our download page.
Setting up the Network
Please refer to our OpusMSFS_Getting_Started_Networked_PCs document located in the OpusMSFS install folder, also available from our download page.
Setting Up MSFS
Please refer to our OpusMSFS_Getting_Started_Single_PC document located in the OpusMSFS installation folder, also available from our download page.
General
Operation

The Operating Mode should be “UNLIMITED MODE” for licensed systems or “DEMO MODE” for the limited demo evaluation mode.
If Live
View is enabled then the Client
App Links value indicates how many client links are open and No. Connected indicates how many clients are currently connected. In
addition you may View Client App
Links and Spy on the
links (ref OpusMSFS_Getting_Started_Networked_PCs).
The Device Drivers value indicates how many driver links (ButtKicker, FSC TQ control, CPFlight panels) are open and No. Connected indicates how many devices are currently connected. In addition you may View Device Driver Links and Spy on the links.
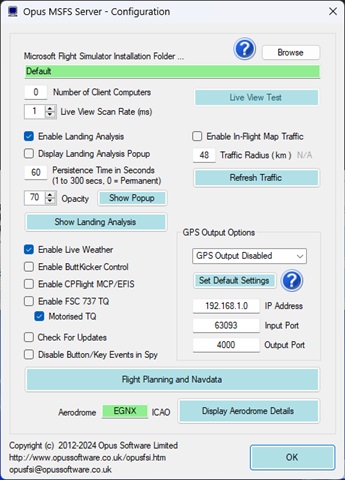
The Configure button opens the configuration dialog in order to configure options for Live View, the In-Flight map, device drivers (ButtKicker, FSC TQ control, CPFlight panels), GPS output options and Landing Analysis.
Toggle Spy toggles the Spy window. The Spy window is described in the Getting Started guides.
Toggle Map toggles the display of the In-Flight map. If 'Enable In-Flight Map Traffic' is enabled in the FSISERVER Configuration settings then the 'Toggle Map' button will remain greyed out until the traffic data has been fully initialised.
Shortcut Controls are described in this document.
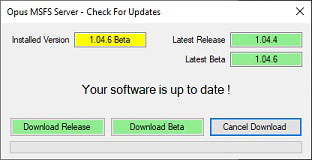
Check for Updates will display a popup detailing your current OpusMSFS version and the latest Release and Betas versions available. The buttons at the bottom of the dialog enable you to download the latest software.


Enter your custom Microsoft Flight Simulator Installation Folder if you have installed anywhere other than the default location.
The Number of Client Computers, Live View Scan Rate and Live View Test button are related to Live View mode. Please refer to our OpusMSFS_Getting_Started_Networked_PCs guide.
To enable landing analysis tick the Enable Landing Analysis and the optional Display Landing Analysis Popup options and refer to the Landing Analysis section for further details.
If you are using a ButtKicker device then tick the Enable ButtKicker Control checkbox and refer to the OpusMSFS_ButtKicker guide for further details.
If you are using CPFlight MCP/EFIS 737 panels then tick the Enable CPFlight Panels checkbox and refer to the CPflight MCP/EFIS 737 Panels section for further details.
If you are using a FSC TQ throttle device then tick the Enable FSC TQ Control checkbox and refer to the OpusMSFS_FSCTQ_User_Guide.pdf guide in your installation folder for further details.
Check for Updates will display a popup detailing your current OpusMSFS version and the latest Release and Betas versions available. The buttons at the bottom of the dialog enable you to download the latest software.
Select Disable Button/Key Events in Spy if you don't want to see these events in the spy window.
Refer to the In-flight Moving Map section for details of the Enable In-Flight Map Traffic, Traffic Radius, Refresh Traffic, and Weather Options (Weather Engine and Weather Locator features included just in case people find the features (reports etc.) useful, and ready should MS and Asobo allow some form of supported weather injection in the future).
If you wish to enable ouput to a GPS package then tick then configure the GPS Output Options as decribed in the GPS Output section.
Refer to the Flight Planning and Navdata section for details of the Flight Planning and Navdata.
The Aerodrome ICAO text box and accompanying Display Aerodrome Details option can be used to display the internal OpusMSFS location and runway data on any aerodrome in the Spy window.
Standalone systems
If you have a standalone system then simply run the SERVER program on your MSFS computer system, the program should be run after MSFS.
Networked systems
The OpusMSFS network is created by running the SERVER program on the main (host) Flight Simulator PC, and running the CLIENT program on each client PC. Each of your computers must be able to 'see' each other over the local area network (refer to our OpusMSFS_Getting_Started_Networked_PCs document). The OpusMSFS software will make efficient use of any speed of network, but the faster the better.
You must install MSFS and the OpusMSFS
software on each of your client computer systems (laptops or PCs), along with
all the scenery and airport addon packages. If you wish to display external
aircraft views on the client computers you will also need to install all
relevant aircraft addons. The OpusMSFS
software does not need to be licensed on the client systems, the purchased
license is only required for your main 'flying' server system. You may either
copy or install the OpusMSFS software
on each of your client systems, the FSICLIENT
program that you will run on the client computers does not check for any
licensing information. It simply connects to and receives all necessary data
from your main server system.
The recommended start up procedure for the SERVER and CLIENT programs are detailed in our OpusMSFS_Getting_Started_Networked_PCs document. You can monitor the connection status on the server program's Client App Link display and each of the CLIENT programs. In each case, the Application Links will turn green when a connection is made. Note, the server will allocate two links for each 'Live View' client, one link for each of the possible 'Live View' Position & Attitude connections.
Home About Us Products Downloads FAQ Gallery Testimonials Contact Links
