
|
MSFS
Flight
Simulator Interface for |
|

MSFS_v6_Overview MSFS_v6_User_Guide MSFS_v6_Getting_Started_Single_PC MSFS_v6_Getting_Started_Networked_PCs MSFS_v6_ButtKicker
![]()
OpusMSFS
Flight Simulator Interface for MSFS
MSFS ButtKicker
Audio Control

14 Feb 2024
Opus
Software Limited
Email:
opusfsi@opussoftware.co.uk Website:
www.opussoftware.co.uk/opusfsi.htm
Contents
Modifying a Profile's Assigned Aircraft Types
Moving a Profile Up and Down the List
Installation
The
ButtKicker must be wired into the audio. We recommend using a Sound
Blaster X-Fi Go PRO USB sound card for the ButtKicker control to
separate the BK audio control signals from the simulator's sound.
You
should configure your normal MSFS sound device, which normally has
the speakers attached, as the Windows Default sound device in Control
Panel. Then you assign MSFS to the default sound device.
If
you have a separate sound card for the ButtKicker then configure it to
its assigned USB device which is NOT assigned as the default and is
totally separate to your sim and speaker sounds. Ensure 3rd party addon
sound packages do not use this separate sound card, they should
use the default speakers instead.
Do NOT
plug the ButtKicker into your primary speaker device, it will not work,
it MUST be plugged into the dedicated USB sound card device.
If you use choose to use a shared audio card then you will most likely be able to hear the BK audio since the human ear is sensitive throughout the entire BK frequency range. In this case without a separate sound card for the ButtKicker, you should disable 3rd party addon sound packages since they will conflict with MSFS.
Warning
ButtKicker
Power Amplifiers
have been known to overheat in the past so please take care in adjusting
the ButtKicker control options and volume levels. We recommend to keep
the volume levels adjusted to give a slight trembling effect with just a
subtle hint of motion or vibration even at the maximum volume level
setting.
Whilst
in use always monitor the power amplifier to make sure the unit is not
overheating.
Disclaimer
Opus Software Limited assumes no responsibility or liability for
any injury, loss or damage incurred as a result of use of the ButtKicker
device or the Opus ButtKicker audio control software.
Introduction
The
current software includes audio control during taxiing, engine
vibration, flaps movement, general turbulent motions, turbulent bump or
jolt effects, spoiler or speed brake movement, landing gear movement,
landing, roll out after landing and reverse thrust. This version also includes
frequency mixing to allow the audio signals for up to three effects to
be modulated together.
If
upgrading from previous version, you may need to re-specify your Master
Volume and reassign all defaults to all the effect options via the
individual Default buttons. See our SimForum Announcements or
\OpusMSFS\MSFS_Release_Notes.txt for details.
FSIAIRCRAFT.log
The generated c:\OpusMSFS\FSIAIRCRAFT.log file identifies each path searched and the total number of aircraft types identified in those paths. The head of the log file will read something similar to the following,
Path D:\FS2020\Official\OneStore
Path D:\FS2020\Community
Total 114 Aircraft Types Identified
Asobo_208B_GRAND_CARAVAN_EX
Asobo_208B_GRAND_CARAVAN_EX_LiveryAviators
Asobo_208B_GRAND_CARAVAN_EX_Livery_Emerald
Asobo_208B_GRAND_CARAVAN_EX_Livery_Global
Asobo_208B_GRAND_CARAVAN_EX_Livery_Kenmore
Configuration
The ButtKicker
enable option is configured via the OpusMSFS
server's Configuration
dialog, accessed via the Configure
button on the server's main form.

SERVER
Configuration Dialog
The
FSIBKCTRL.EXE program is used on MSFS (dotNet 4) systems.
This control program is activated automatically by the OpusMSFS server. This removes from
MSFS the burden of audio control.
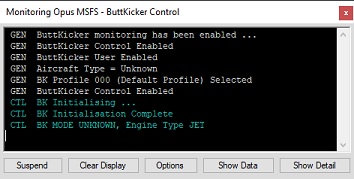
The state, options, size, and position of the
ButtKicker Control Spy window is saved on program exit and restored on restart. Different coloured text is used to differentiate between the various control actions and audio channels. The Spy buffer is cleared automatically after 30 minutes.
ButtKicker
(FSIBKCTRL.EXE)
Configuration Dialog
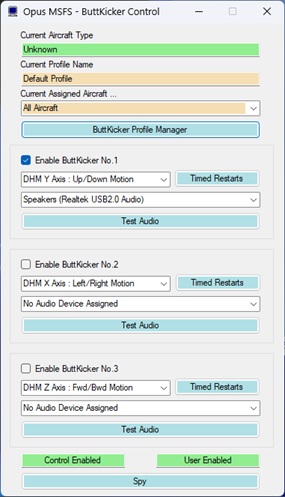
The ButtKicker Control dialog is used to enable the ButtKicker
devices, associate a DHM xyz axis to the device, assign an audio
output to the device and invoke the ButtKicker Profile Manager.
There is a known bug in DirectX where the
audio device order can be wrong, so if the obvious device selection does
not work then try a different listed output. You can use the Windows
Sound monitor (the dialog you use to adjust master volume it also allows
you to select audio devices) to see the BK audio output on the desktop.
After enabling a ButtKicker device and
assigning an audio output the Test
Audio button should be used to test the selected audio output. For
this you may need to plug in speakers, a headset, or the actual
ButtKicker device.
ButtKicker
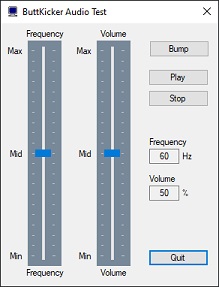
Audio Test Dialog
The ButtKicker Audio Test dialog is used to test the audio
output for the selected audio device. The synthesized low frequency
signals can range from 10Hz to 110Hz, these sounds are audible with the
correct volume adjustment in both speakers and headphones.
Use the sliders to adjust the frequency and
volume output of the signal. Press the Play
button to output the audio signal, press the Stop
button to stop the audio output. The Bump
option can be used to simulate a Bump signal using the Bump parameters
configured in the ButtKicker Options dialog (accessed via the ButtKicker
Control's dialog's Edit BK No.x button).
This dialog will be found useful when testing the ButtKicker
response to certain single frequency audio outputs and volume levels.
After testing the audio output (which is audible) the ButtKicker Profile Manager button should be used to display the ButtKicker Profile Manager dialog in order to manage the ButtKicker profiles.
ButtKicker Profiles
When an aircraft type is selected in the simulator the program will search for a matching profile from profile
number 001 onwards. The first profile with a matching aircraft type will be selected. If no match is found then the Default Profile (000) is selected.
The Default Profile
is always the first profile in the list and it's assigned to All Aircraft types.
Each ButtKicker Profile consists of a profile name, an assigned aircraft list, and the setting options for up to three ButtKicker devices (labelled BK No.1, BK No.2, and BK No.3).
Named profiles 001 onwards are user specified and always assigned to at least one aircraft type. These profiles are never global, they can never be assigned to 'All Aircraft'.
All current profiles are displayed in the Management dialog's list using the following display format,
XXX Profile_Name NN First_Aircraft_Type_in_Assigned_List
Where 'XXX' is the profile number (000 onwards) and 'NN' identifies the number of assigned aircraft. The Default Profile is always listed as '00 All Aircraft'.

Creating a New Profile
Use the
Create button to create a new ButtKicker profile. After clicking the button you will be presented with a list of currently available aircraft types.
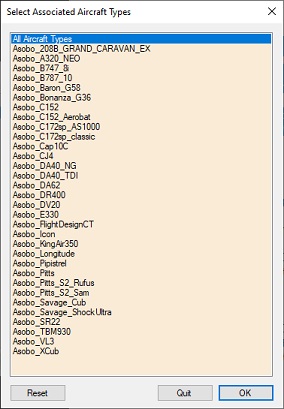
Highlight one or more of the listed aircraft using the normal Windows mouse selection methods. Hold down the Ctrl key to add/remove individual aircraft types. Hold down the Shift key to select consecutive groups of aircraft types. Once all aircraft types have been highlighted click on the OK button to create your new profile.
Once created, the new profile will be initialised with all default settings and automatically named <first_aircraft_type> Profile. If needed, you can edit the profile's name using the Edit button.
Cloning an Existing Profile
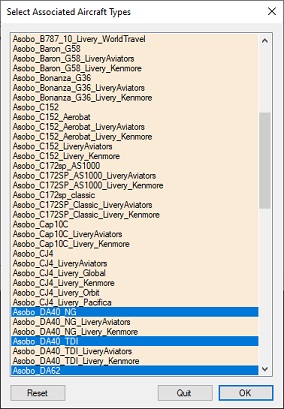
Use the Clone button to clone a highlighted ButtKicker profile. After clicking the button you will be presented with a list of currently available aircraft types. Highlight one or more of the listed aircraft using the normal Windows mouse selection methods. Hold down the
Ctrl key to add/remove individual aircraft types. Hold down the Shift key to select consecutive groups of aircraft types. Once all aircraft types have been highlighted click on the
OK button to create your new cloned profile.
Once cloned, the new profile will be initialised with all source profile's settings and automatically named <first_aircraft_type> Profile. If needed, you can edit the profile's name using the
Rename button.
Editing a Profile
To edit a profile simply highlight the profile using the mouse and click on the
Edit button. The Default Profile (000) cannot be edited. After clicking the
Edit button the
ButtKicker Profile Editor dialog will be displayed.
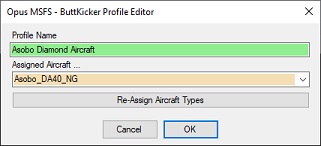
Edit the profile's name in the text box or examine the aircraft list using the dropdown arrow. Use the Re-assign Aircraft Types button to make changes to the aircraft list and enter OK or Quit.
Use the OK button to action the changes. Use the Cancel button to abort the operation.
Deleting a Profile
To delete a profile simply highlight the profile using the mouse and click on the
Delete button. The Default Profile (000) cannot be deleted. After clicking the Delete button you will be prompted to confirm the operation before the profile is deleted.
Modifying a Profile's Assigned Aircraft Types
The assigned aircraft types cannot be edited directly. If you want to modify the assigned aircraft types for a profile you must
Clone the profile to assign the new aircraft list then Delete the original profile.
Moving a Profile Up and Down the List
Profiles within the displayed list can be moved up and down the list using the green Up and Down Arrow buttons. The Default Profile cannot be moved and always will be listed as profile 000.
Editing a Profile's Options
A profile's settings (options) can be altered using one of the Edit
BK No... buttons. Use the Edit BK No.1,Edit BK No.2, or Edit BK No.3 buttons to alter the settings for configured ButtKicker Devices 1 to 3 respectively.
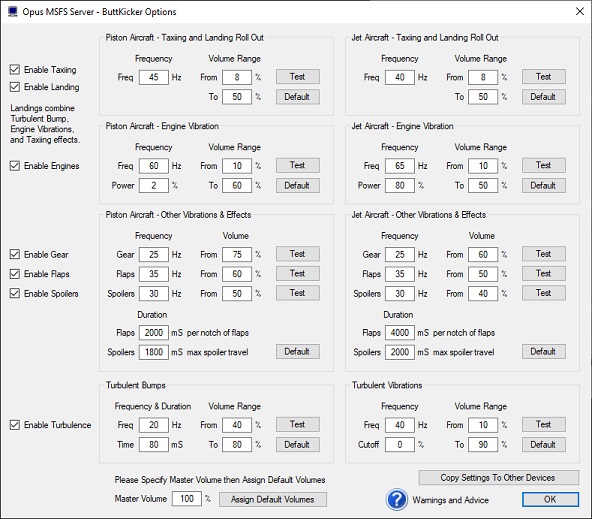
Tweak the frequency options and set the required
Master Volume level and if necessary tweak the individual effect volume
levels.
The current ButtKicker
Warnings and Advice can be displayed using the question mark (?)
icon at the bottom of the dialog. The ButtKicker Warnings and Advice is
also automatically displayed the first time you click on the OK button
to ensure the ButtKicker Warnings are displayed including the Disclaimer statement from Opus Software Limited.
There is actually no real need to make great
changes to the default settings, just set your Master Volume and
use the Assign Default Volumes to adjust the default volume
levels as described below. The BK has a limited range and response so
there really isn't any great need to tweak very much at all, the default
frequencies should all be pretty close to their ideal settings.
Setting The Master Volume Level
The Master
Volume level can be specified as a percentage using the box
provided. We recommend that all ButtKicker volume levels and ranges are
set so that the ButtKicker Power Amplifier does not need to clip the
signal at any of the specified volume levels or ranges.
For all but the Turbulent Bump effects, we
recommend you set the volume levels to achieve a smooth rumble effect
or a smooth trembling of the seat or platform. The ButtKicker
effects should provide a subtle hint of motion or vibration rather than
sudden and violent jolts.
To aid this we have provided Default volume
settings, these can be set individually using the various Default
buttons, in which case both
the recommended frequency and volume levels are set. Alternatively,
after specifying a Master Volume,
all effect volume levels can be adjusted and assigned with appropriate
defaults using the Assign Default
Volumes button.
Normally the
Master Volume will be set to match the Device and Application Mixer
volume sliders displayed either using the Speakers icon on the taskbar
or by opening the Volume Mixer dialog in Windows.
All default volume levels and ranges have been
set for a typical direct feed from an installed 'internal' sound card
and assuming a Mixer Volume setting of 100%. Hence setting the Master
Volume to 100% will assign the lowest default volume levels
and ranges as it assumes your Window's Mixer Volume has been turned up
full.
Setting a lower Master
Volume level and hitting the Assign
Default Volumes button will result in increased volume levels and
ranges being set. You can use this adjustment to match your own
preferences keeping in mind the overall goals and recommendations for
the ButtKicker effects.
If you are using a USB sound stick, such as
the recommended Creative Labs Sound Blaster X-Fi Go PRO USB sound card,
then even with the Window's Mixer Volume set to 100% you may need to
reduce the Master Volume setting to 70% or 80% to correct for the lower volume
output of the USB sound stick.
You can use either the Test
buttons to get an idea of the ButtKicker response to the settings.
Alternatively, use the Test Audio
dialog and Play option to get
an idea of the ButtKicker's response to a specific frequency and volume
level setting.
Engine Vibration Power
Level
At present the default Engine Vibration Power level for Piston Aircraft has be set at
2% so that a gentle vibration can be felt
providing feedback of the current throttle setting whilst flying light
piston aircraft. However, the default power level for Jet (heavy)
aircraft has been set at a higher level (currently 80%). This higher
power level setting is to ensure no vibration is felt at normal cruise
power (N1) settings and hence you will not have the ButtKicker device
permanently active on your medium and long haul flights. If you do fly
for extended periods in a light piston aircraft you may like to consider
increasing the power level setting to 80% for Piston Aircraft , this
should achieve the same thing and only bring in the ButtKicker vibration
for the higher climb power settings.
Turbulent
Vibrations Cutoff
The general turbulence threshold or cutoff point can be set by
adjusting the 'Cutoff' parameter in the Options dialog. A
setting of 0% will result in a threshold equal to the average turbulence
deflection for the specified DHM axis. A setting of 50% will set the
threshold to the midpoint between the average and maximum DHM
deflection. A setting of 100% will disable the general turbulence
effects altogether.
Copy
Settings to Other Devices
If you have more than one ButtKicker device
then this option can be used to copy the settings to all other devices.
Initialisation
A single pass initialisation sequence helps settle
the Windows audio out interface and also exercise the ButtKicker
devices.
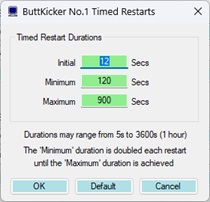
Timed Restarts
Timed restarts of the audio output have had to be introduced to
overcome a looping problem within the Windows Audio Out functions which
results in secretly silencing the audio output (aborting the audio loop)
after short periods. This mostly happens after the program is first
started.
The Timed Restart settings for each ButtKicker device can be changed via the Timed Restarts buttons within the main ButtKicker Control dialog.
The timed restarts are also applied to all 'Test Audio' sounds. Three durations are employed, namely the 'Initial', 'Minimum', and 'Maximum' durations. After the 'Initial' delayed restart the 'Minimum' duration is applied and doubled after each restart until the configured 'Maximum' duration is reached. Each setting may range from 5 seconds up to maximum duration of 3600 seconds (60 minutes). The 'Default' button can be used to revert back to the pre-beta default of 5, 15, and 300 seconds.
Spy Messages
These messages can be seen by clicking on the right-hand Spy
button on the ButtKicker Control main dialog. These messages will indicate
the current mode, frequency, and volume of the BK audio and are
indicated with the following messages.
TST
BK Initialising ...
TST BK Initialisation Complete
TST
BKn.x Timed Restart:
xx secs
TST
BKn.a <ID> PlaySound:
freq Hz, vol
TST
BKn.a <ID> Volume:
vol
TST BKn.a Stopped
TST
BKs Stopped All
Where 'n' indicates the ButtKicker device
(1..3), 'a' identifies the audio channel (0..2, or x), and <ID>
indicates the current mode or origin for the sound,
GND =
Ground taxiing or roll out after landing effects.
ENG =
Engine vibration effects.
GEAR = Landing gear effects.
FLAPS = Flaps deployment effects.
SPOILERS = Spoilers or speed brake deployment effects.
freq =
The audio frequency, ranging from 10 to 110 Hz.
vol
= The volume level,
ranging from 1 to 100%.
Shutdown ButtKicker
The ButtKicker control program (BKCTRL) is monitored and automatically restarted by the
OpusMSFS server program should it shutdown for any reason. If you want to shutdown the program you must either disable ButtKicker control in the server program's configuration or shutdown the
OpusMSFS server program.
Home About Us Products Downloads FAQ Gallery Testimonials Contact Links