
|
OpusFSX Flight
Simulator Interface for |
|

OpusFSX_Overview OpusFSX_User_Guide OpusFSX_Getting_Started_Single_PC OpusFSX_Getting_Started_Networked_PCs OpusFSX_Live_Weather OpusFSX_Live_Camera OpusFSX_ButtKicker
![]()
OpusFSX
29
July, 2014
Opus Software Limited
Email: opusfsi@opussoftware.co.uk
Website: www.opussoftware.co.uk/opusfsi.htm
Contents
Slow and Low Flyer Configuration
Save Current Weather as Static Theme
Recommended
Settings and Practice
METAR
Station List Corrections and Additions
Weather Data Import (current and
historic)
Turbulence
and Dynamic Head Movement (DHM)
Flight Planning Assistant Reports
PMDG FMC Wind/Temp Data Request
Reporting Anomalies and Errors
The
Live Weather Engine is a standard feature within the OpusFSX
Flight Simulator Interface for the Microsoft's Flight Simulator X and Lockheed
Martin Prepar3D simulators.
The Live
Weather Engine provides live weather updates on your OpusFSX
system. The live weather data is acquired by either downloading the current
METAR reports for all Met stations within your weather horizon or importing the
METAR reports contained within a user specified import file. The weather
engine's horizon covers an area of 1280km by 1280km centered on your aircraft's
current position, this is the size of the detailed Dynamic
Weather region created by the engine.
As you are probably
aware the use of METAR data to update the weather in the simulator leaves a lot
to be desired. To adjust the weather correctly using METAR updates you are
forced to clear the current weather completely and either load a totally
unrealistic globalised weather pattern, resulting in the same weather horizon to
horizon and false ATC and ATIS reports, or reload the new METAR data very slowly
one station at a time. This METAR update process is not only totally
unrealistic, but can result in a great deal of screen flicker while the
simulator slowly loads the new METARs. There are also problems with METAR voids,
METAR morphing, and inconsistent weather synchronization across networked
systems using METAR updates. These problems are inherent within the FSX and
Prepar3D simulators. On the other hand, our Dynamic
Weather loads instantly into the simulator with no screen flicker, no
disturbance to the flight, no weather morphing, and no inconsistencies with ATC
or ATIS.
-
Live Weather constructs Dynamic Live Weather from current live (or historic) METAR data.
-
Accurate detailed weather as far as the eye can see throughout your flight. No more unrealistic globalized weather from horizon to horizon, with OpusFSX you can see distant weather patterns all around you. See the changing weather patterns en route as you fly.
-
Live Weather provides instant weather updates. No more unrealistic clearing of the weather prior to updating. No more annoying screen flicker as METARs are slowly loaded into the sim.
-
No more METAR voids or unrealistic METAR data morphing.
-
No more inconsistencies with distant ATC and ATIS reports. Accurate Destination Weather when over 200km away, with perfect weather reports at any distance to any point en-route.
-
OpusFSX weather reports can be used instead of ATIS, and at non-ATIS airstrips.
-
Live Weather allows you to see low lying mist and fog patches.
-
Live Weather creates very realistic cloud, visibility layering and an overcast effect.
-
Live Weather lets you turn on, off, or automatically generate the cirrus cloud effect.
-
The Live Weather Engine supervises both the turbulence and ultra-realistic Dynamic Head Movement utilising actual real-life captured 3D accelerometer data.
-
Create your own named weather themes from the current weather.
-
Load your own custom weather using a simple METAR import file.
-
Load historic weather from within the last 24 hours.
-
Dynamic Weather reports displayed during flight for your local area, destination, alternates, en route, lower and upper atmosphere weather.
-
Flight Plan Assistant imports activated flight plans and provides dynamic flight plan weather reports together with detailed reports on METARs, GRIB lower and upper atmosphere weather, flight plan waypoint weather and SIDs/STARs ordered according to direction and distance.
-
Live Weather Assistant provides maps of Surface QNH, Surface Winds, Surface Visibility, Surface Temperature, Precipitation Levels, Low Cloud Cover and Met Station Cover for the current 800 x 800 mile weather map.
-
Client Side Weather Control enables you to edit flight parameters and display weather data on a networked client PC.
-
Live Weather allows perfect synchronisation of dynamic weather and cloud formations on networked systems.
The Live Weather Engine
does not include any sky and cloud textures. For optimum effect we strongly
recommend you install sky and cloud textures from packages such as Flight
Environment X (payware) or HDEv2 (freeware) for clouds with the sky upgraded by
Danny Glover, and use the OpusFSX Live Weather Engine for the actual weather
updates.
We would strongly
recommend using lower resolution 1024 cloud textures and also not using HD cloud
textures, this will be beneficial in terms of frame rates as well as looking
more realistic and less harsh.
If
you cruise below FL200 then just set your Destination, Max Cruise
Altitude and enable Adjust Options Automatically.
Alternatively,
if you prefer to set options manually, then disable Adjust
Options Automatically and set ALL DEFAULTS in the Weather
dialogs, then you are already set for low and slow flying. Always make
sure you specify your Destination
within the Weather dialog. Low flyers should not set the Enable Wind
Stabilisation option since the LWE will automatically
stabilise the wind should you climb above the Recovery
Altitude + 250 feet or 19250 feet whichever is the higher.
If
you cruise above FL200 then just set your Destination, Max Cruise
Altitude and enable Adjust Options Automatically. If your system has wind shifts enable the Adjust Sim
Friendly Options, if your system has severe
wind shifts then enable the Use Maximum Stabilisation option too.
Alternatively,
if you prefer to set options manually, then disable Adjust
Options Automatically and specify your Destination within the Weather
dialog and enable the Download GRIB
Forecast option to get GRIB forecast data for winds and
temperatures aloft. Enable the Sim Friendly
GRIB Winds option to minimise the chance of wind shifts.
If your system is well behaved and you want true forecast data at all
times then turn off the Sim
Friendly GRIB Winds
option. But this option gives you winds very close if not the same as
the true forecast, especially if you have specified your Cruise
Altitude. Select the Enable
Wind Stabilisation option in
the Weather Smoothing and Stabilisation dialog to minimise the chance of
wind shifts. When set the surface winds injected into the simulator will
be stabilised (static) everywhere until such time as they are recovered
by the LWE. Stabilised winds are indicated in the Opus weather report
windows with the phrase 'Static DDD/SS' immediately after the actual
surface wind.
If, and only if, your system still experiences 'major' wind shifts during the cruise then you can also set the Stabilised GRIB Data option, but most systems will not need this option. It is included for the few that do.
You will need to set
your FSX to run in windowed mode (i.e. press ALT+ENTER, or turn off full screen
mode in the FSX View menu) in order to display the FSXSERVER form. The server
and all client displays will be paused whilst the dialog is active.
The Live Weather Engine
is enabled via the OpusFSX server program's Configuration dialog, accessed via
the Configure button on the FSXSERVER's main form.
To enable, tick the Enable Live Weather Engine checkbox within the Configuration dialog.
Ensure you have
disabled all other weather injection from FSX/P3D, third party engines, VATSIM/IVAO etc.
You can temporarily
enable and disable Live Weather updates, or force an update of the Live Weather
using the OpusFSI Live Weather options within the simulator's Add-on menu.
The Live Weather update
parameters and import options are specified within the Weather dialog, accessed
via the Weather button on the FSXSERVER's main form.
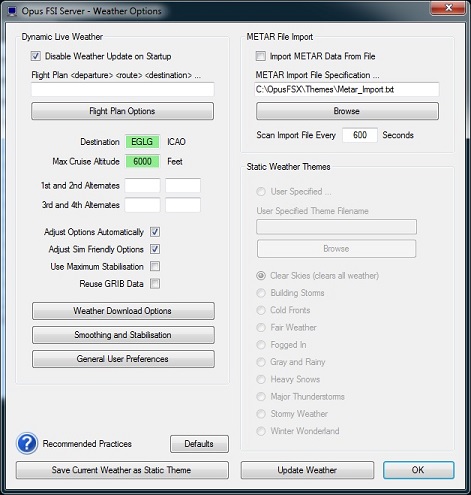
If the Disable
Weather Update on Startup option is enabled the LWE will remain dormant until you force
a weather update either via the Addon menu or via the Update
Weather button in the dialog, or via a Shortcut Control. This option allows you to enter their
flight details and adjust the weather settings prior to generating and
updating the weather at the start of your flight.
You may enter (or
paste) your flight plan, or a list of ICAO, nav aids and general
waypoint codes into the Flight
Plan or En Route Station List edit box. Your flight plan destination ICAO will be automatically copied to the Destination
ICAO field. Refer to the section below for a
description of the Flight Plan Options.
Configure a Destination
ICAO Code and up to four alternate airfield designations. Always
specify your destination ICAO, this is very important in preventing wind
shifts. The specified destination and alternate airfield weather is
updated automatically without the need to constantly download new METAR
reports. These automatic updates ensure compliance with the current
downloaded METAR reports at these locations. You can change the ICAO
codes in flight. It is recommended you update the weather manually (via
the dialog or add-on menu) when you change the ICAO codes, either before
a flight or whilst airbourne.
Weather
Report windows provide accurate weather reports for the specified
destination and alternate airfields. These reports can be used in place
of ATIS and are accurate out to the edge of the weather map (640km about
400 miles or 345nm).
The
Cruise Altitude setting in
the weather dialog allows you to specify a reference cruise altitude.
You can enter a three digit flight level, or FLnnn format (e.g. FL230),
or an altitude. All altitudes less than 1000 feet are interpreted as an
implied flight level. For the Sim Friendly GRIB wind adjustment, any
cruise altitude less than 20000 feet will reference the forecasted
tropopause height.
The
Adjust Options Automatically option uses your specified Max Cruise Altitude to
determine the optimum weather settings for your flight including the Recovery
Altitude and Forced Recovery
altitude. If your cruise altitude is below 6000 feet then GRIB will be
disabled. Refer to the Automatic Settings section for further details. If you prefer to set these manually then you can do so in the Smoothing
and Stabilisation dialog, remember to disable the Adjust Options Automatically option
first otherwise it will override your manual settings. If you have problems with wind shifts or
temperatures then enable Adjust
Sim Friendly Options, which will select Sim friendly GRIB winds and
temps, again if you prefer to set these manually then you can do so in
the Weather Download Options dialog. The Use Maximum Stabilisation option should
be enabled for systems
that suffer badly from wind shifts. Wind and pressure stabilisation is
enabled together with Stabilised
GRIB Data if appropriate. You can set Stabilised GRIB Data manually
in the Weather Download Options dialog.
The
Reuse GRIB Data option forces
the LWE to reuse the previously downloaded GRIB data on your PC instead
of attempting to download a new cycle. It is intended for use when the
NOAA GRIB server is unavailable. The option is disabled by default on
OpusFSX startup. The option is automatically enabled once airborne, this
is done to prevent any new GRIB cycle data being downloaded after
landing. Any new cycle data files will be downloaded only when on the
ground before the very first flight.
If
you have set your Destination,
Max Cruise Altitude and
enabled Adjust Options Automatically then
you can go ahead and fly without setting any further options in the
Weather Download, Smoothing and Stabilisation, and General User
Preferences dialogs, they are provided for you to tweak the settings
manually if required.
Defaults
The Defaults button sets all recommended default options.
Update
The Update
Weather button forces a weather update and downloads METAR and GRIB
data if necessary. The OK button reloads the current weather data according to your new
settings and will not download the METAR and GRIB data again.
Identifying your Navdata Source
The flight
planning assistance software decodes the standard Navigraph Navdata
Navaids and Waypoints text files for use in identifying all Nav aids and
general waypoints within the your flight plan. First locate your Navdata
folder.
The standard
<SIM>\Navigraph\Navdata\ path is the default location for these
files but you may Browse to different folders on FSX and Prepar3D
systems should they be located elsewhere (e.g. NavDataPro folder). The
Navigraph Navdata supplied for the PMDG aircraft is in your
<SIM>\PMDG\NAVDATA folder in the wpnavaid.txt and wpnavfix.txt
Navigraph files. iFLY files are in the <FSX>\iFly\Navdata folder.
If you do not have
any Navigraph files then a
default version of the files (apart from SIDs and STARs) are
automatically installed into your <SIM>\Navigraph\Navdata folder,
to update these subscribe to Navigraph's FMS data service at
www.navigraph.com.
You will know if
OpusFSX has extracted the Nav data because the NAVAIDS.DAT and
WAYPOINTS.DAT files will be created in the OpusFSX folder. The NavData
is reloaded each time you change the folder location, or press the Reload or Process the Flight Plan buttons, or
exit the dialog.
N.B. you only need
to identify your Navdata folder once and it will be used for all
aircraft types, you do not need to change the Navdata folder when
selecting aircraft from different manufacturers.
Entering a Flight Plan
The LWE will
automatically import flight plans activated via FSX. The full file specification for all FSX/P3D
activated (loaded) flight plans is displayed within the main Spy window
of the FSXSERVER program. However if you wish to manually import or
enter and process a flight plan then you can do it via this dialog.
Entering a Flight
Plan Manually
If you enter the flight plan manually then your flight plan should start and end with a station's ICAO code, i.e. in the form,
<origin> <nav aids and waypoint fixes and airways> <destination>
e.g. EGCC 53.317167N2.318000W WAL33 TULIP LFST
Your departure and
destination points are required in order for the software to identify
the specific Nav aid or waypoint since many of them have shared names.
So make sure you specify your origin and destination ICAO codes. The
origin, destination and fixes can also be defined as Lat Lon fixes.
The formats for Lat
Lon fixes are as follows,
| <sign><lat>/<sign><lon>:<code> | e.g. 12-34-56/-123-45-67 or 1234/-12345 or 1.23/-1.23:ABC1 |
| <lat><N or S><lon> <E or W>:<code> | e.g. 12-34-56N123-45-67W or 1234N12345W or 1.23N1.23W:ABC1 |
| <N or S><lat><E or W><lon> :<code> | e.g. N12-34-56W123-45-67
or N1234W12345 or N1.23W1.23 |
where
| <sign> = | + (optional) to indicate North or East |
| - to indicate South or West |
|
| <lat> = | dd-mm-ss |
| ddmm |
|
| deg.deg | |
| <lon> = | ddd-mm-ss |
| dddmm |
|
| deg.deg | |
| <code> = | optional ICAO code or station name |
| dd = | degrees in 2 digits |
| ddd = | degrees in 3 digits |
| deg = | degrees represented in decimal form e.g. 30 minutes would be 0.5
degrees |
| mm = | minutes in 2 digits |
Importing a Flight
Plan
You can import any Microsoft FSX or FS9 PLN formatted
flight plan (with .PLN filename extension). The
import option will initialise its path to your My Documents
folder ready for you to navigate to your actual Flight Simulator X
Files, Prepared3D Files, or other folder name (for foreign
language systems). Your PLN folder's location is remembered by the FPA
software after you have selected the required .PLN filename. An Import
Cruise Altitude checkbox option is provided to
All flight plans
activated within the simulator are decoded and processed automatically.
For this to happen the FSXSERVER program must be running before the
flight plan is loaded into the simulator.
Processing a Flight Plan
The software
ignores all identifiers that are not listed as Nav aids and waypoints.
Airways are recognised provided the entry point is specified, also if
you have specified both entry and exit points in the flight plan
(usually done) then the FP Assistant will replace the Airway with the
list of points en route and provide weather information and upper
winds/temps for each of those navigation points.
The
nearest four Met stations within 128km (80 miles) of a navigation point
are added to the download list. The Flight Plan Options dialog lists all
identified navigation points extracted from your flight plan.
Click
on the Process the Flight Plan
button to decode the Flight Plan and display the result in the
Identified Navigation Points box. The navigation aids and waypoints,
where they exist, are displayed with their Lat/Lon coordinates, general
type and two letter country codes. Where possible the
specified label of any lat/lon waypoint fixes are shown. Airway fixes
are displayed in green.
Just
remember to force a weather update to download the METARs. Until then
there will be no METAR data since it hasn't been downloaded. After
downloading, all the non-reporting Met stations are removed from the
list.
The
Flight Plan En Route Weather
Report displays the navigation points associated with each listed
Met station, refer to the Weather Reports section for further details.
The OpusFlightReport text file in the OpusFSX\Themes folder provides details of all
cruise winds, cruise temperatures and local weather reports at each of
the navigation points.
Deleting
a Flight Plan
To
delete a flight plan simply press the Reset
button.
Disable the Adjust Options Automatically option
in the Weather dialog if you wish to manually set Download GRIB Forecast Data or
the Weather
Update on Approach parameters.
Also disable Adjust Sim Friendly
Options and Use Maximum
Stabilisation if you wish to set the parameters manually here.
Dynamic Weather Options
The default
Weather Update settings are 60 minutes and/or 160km travelled. The
minimum Live Weather Update frequency and distance is 5 minutes and 16km
respectively. The Weather Update Period and Distance can be set to up to
a maximum of 60 minutes and/or 400km (248 miles). Any distance above 175km (108 miles) will result in increasing the
injected Dynamic Weather Theme size. Take into
consideration your FSX cloud draw distance and your ground speed when
setting your update time, if the update time is not frequent enough then
you may reach the cloud draw distance before a weather update takes
place. We recommend setting a Cloud Draw Distance of between 70 and 110
miles in the simulator. The lower setting of 70 or 80 miles will be
adequate for low level VFR, and anything from 80 to 110 miles for high
level flying. The clouds at the range of the Cloud Draw Distance will
either condense into view or dissipate out of view as you fly toward or
away from them.
If you do not like
change and you don't fly beyond 192Km then you can disable weather
updates via the simulator's OpusFSX Add-on menu but be aware that if you
eventually perform another weather update, the injected targets may be
completely different from the current wind and may cause one or more
wind shifts.
If you want historic
data then set your sim time to the required time within the last 24 hours and
tick the Download Historic Weather
checkbox.
Tick the Download
GRIB Forecast Data option if you
want to use this forecast data instead of the OpusFSX simulated winds and
temperatures aloft. This is only relevant if you fly above 20,000 feet. Refer to
the Winds and Temperatures Aloft section for further details. After ticking this
box you must manually download the weather using the Update Weather button in
the Weather menu.
Clear Air Turbulence comes into effect above FL200 when the GRIB option is
enabled, note that FSX does not display wing flex for Clear Air Turbulence.
Sim
Friendly GRIB Wind Targets should be enabled along with the Wind Stabilisation option in
the Wind Smoothing dialog on any system experiencing troublesome wind
shifts. The
Sim Friendly GRIB Wind
Targets option
causes the LWE to adjust any 'sim unfriendly' wind changes in direction
and speed.
The
Sim Friendly GRIB Temperature
Targets option
causes the LWE to adjust any 'sim unfriendly' temperatures, enable this
if FSX is having difficulty maintaining its targets.
If
enabled the Background GRIB
Processing option (default ON) will process GRIB data (i.e. GRIB
data extraction and the data decoding) slowly in the background and does
not affect the sim during this period. The GRIB data is extracted and
processed at the beginning of the flight whilst on the ground.
The
Stabilised GRIB Data option goes a
step further for systems experiencing wind shifts in the cruise, and makes the
GRIB forecast data static, i.e. no further GRIB upper wind/temperature forecasts
are downloaded during the flight.
The
possibility of wind shifts cannot entirely be ruled out, this is due to bugs in
the FSX/P3D code, that's why you should always disable the 'Aircraft stress causes damage'
FSX option.
Weather Update on Approach
If you suffer from wind
shifts then tick the Disable Update on
Approach checkbox. On approach, all weather updates will be disabled for Disable
Weather Update For minutes (default 30 minutes) on the final descent as soon
as you descend through the Disable Update
when Below height (default 1800 feet AGL). This process is cancelled
whenever you climb above Assume Cruising
when Above height (default 2000 feet AGL).
Current Data - Weather Servers
Select the required
server NOAA, VATSIM or
IVAO (remember to disable VATSIM/IVAO's own weather injection).
Tick the Use VATSIM for
Missing Data checkbox if you wish to use VATSIM to fill in missing dynamic
weather data (not historic) from the other servers, useful for areas such as NZ.
When the Download NOAA TAFs checkbox is ticked the LWE will download all available TAFs for all METAR stations. This option is only applicable when the NOAA Server is selected. The downloaded TAFs are shown within the OpusFlightReport.txt (FLIGHT PLAN) text report.
Historic Data - Weather Servers
Currently the Secondary Server identifies NOAA, another option for the
secondary server will be implemented in the future.
Low Altitude Wind Smoothing
If you don't suffer
from wind shifts then you can just leave the default maximum values of
15 for Max Speed Change and Max
Direction Change.
Generally the only times when the wind shows greater variation is when
it is calm or just a zephyr, so the direction isn't really important.
Otherwise if you do
have wind shifts at low altitudes (below 20,000 feet) the Max Speed
Change option allows you to fine tune the surface wind smoothing by
specifying the maximum allowed wind speed change every 16km. You can
also specify the Max Direction
Change (default 15 degrees).
High Altitude Wind Stabilisation
Disable
the Adjust Options Automatically,
Adjust Sim Friendly Options and Use Maximum Stabilisation options
in the Weather dialog if you wish to manually set the High Altitude Wind Stabilisation
parameters.
The Enable Wind
Stabilisation option has been provided for users who suffer from wind shifts
and mainly fly at high altitude, typically above 20,000 feet. Wind Stabilisation
applies to both dynamic weather and METAR file import. Ideally set this on the
ground before a flight not during.
Automatic Wind Stabilisation will automatically
enable Wind Stabilisation once you climb above the specified Recovery Altitude +
500 feet.
Enable Dynamic Wind Control is enabled by default but can be disabled on systems
that do not cope too well with the direct ambient wind controls, or in
multiplayer mode if you experience a problem.
Enable Pressure/Temperature
Stabilisation is intended for long haul high level flyers. All weather reports indicate when a 'Static' QNH is in use. The LWE
will recover the surface winds and temperatures separately to the surface
pressure. The LWE always attempts to achieve a smooth recovery of the surface
pressure.
The Recovery
Altitude is where the winds will attempt to recover eventually to the true
surface wind, default 19,000 feet. A lower setting is advised for those
experiencing very serious wind shift problems. It will allow the stabilised
winds to be maintained to a much lower altitude, probably at the expense of
being able to recover the current surface winds reported in the latest METARs. Wind stabilisation is enabled automatically if the
user climbs above the Recovery Altitude plus 500 feet.
The maximum permitted
wind direction change, Max Wind Change,
can be specified (default 30 degrees change). If
you do want to adhere strictly to the METARs (with a risk of wind shifts) then
set the Forced Recovery altitude (see below).
A Forced Recovery altitude (default 12000 feet) allows full recovery
of the reported surface winds after wind stabilisation and during the final
descent from 19,000 feet. The full recovery may cause a wind shift at the
configured altitude, if this is not acceptable then set the altitude to 0 feet
to disable it.
Enable Cloud Smoothing will attempt to preserve all cloud layers and coverage surrounding the aircraft. The extent of the preservation zone increases with increased elevation. All Cloud Smoothing is disabled when the aircraft is within 64km (40 miles) of the specified Destination.
It is not possible to stop FSX re-positioning the individual clouds but the OpusFSX LWE can preserve the cloud layers, cloud types, cloud bases, cloud depths, cloud precipitation, and overall cloud coverage.

The
Thunderstorms Require TS
Descriptor option when enabled only produces active thunderstorm
(CB) clouds when the TS descriptor is specified within the METAR
statement. When this option is disabled either TS or CB in the METAR
will produce an active thunderstorm.
The
Magnetic Variation
is disabled by default. When enabled, there will be a difference between
the reported wind directions METAR and GRIB forecast data which always
report directions with respect to True North and the current wind
directions within the simulator and reported by ATIS which are always
Magnetic directions. To assist the pilot, the LWE will show the current Magnetic Variation
in the weather report windows, displayed in the form 'MagVar XX.X' at the end of
the surface wind information. You must ADD
this value to all wind directions to convert them to Magnetic directions
at the current location. Please note, OpusFSX cannot show the Magnetic
Variation at the Destination or Alternate sites, only at your current
location in the simulated world.
The
Include Wing Flex Data option is disabled by default to prevent
the simulator erroneously fluctuating the ASI and VSI when the
simulator's turbulence and thermal setting is enabled. This simulator
turbulence effect is responsible for providing wing flex and ASI
fluctuations. The erroneous fluctuations interfere with and fight
against the normal ambient wind target changes within the sim making
them undesirable, and problematic in some aircraft sims (e.g. the MD
aircraft types). If you wish to enable
the simulator's turbulence and thermal effects giving you wing flex (FSX
menu option - Options, Settings, Display. Select the Weather tab, there
is an option for turbulence and thermal effects on the aircraft, make
sure it is not disabled), you must also tick the Include
Wing Flex Data option. To see wing flex enable the 'Advanced
Animations' option in the FSX menu option - Options, Settings, Display -
Graphics tab. Note, the wing flex option can cause some aircraft
simulations to loose A/T or A/P lock.
High level cirrus cloud is not included within the standard METAR reports.
The Auto Cirrus
Clouds option automatically displays cirrus cloud whenever it
determines the weather is quite changeable, possibly due to a weather
front. The cirrus cloud coverage is generated randomly between the
configured lower and upper Cirrus
Altitude Range based on the aircraft's current latitude. The lower
range will be adjusted to between 10,000 feet at the poles to 20,000
feet at the equator, the upper range will be adjusted to between 25,000
feet at the poles to 60,000 feet at the equator. The calculated limits
are graduated throughout the polar, temperate, and tropical zones. For
example, at EGNX East Midlands (latitude 52.8 degrees) the limits are
set to range from 15,900 to 43,100 feet. In fairly stable conditions the
cirrus cloud will be disabled. In flight, the cirrus is reassessed every
80 miles flown.
Disable Cirrus
Clouds if you don't want any cirrus clouds at all, either auto or
random.
If you haven't selected
auto cirrus or disabled cirrus clouds then the Live Weather Engine
generates a single cirrus cloud layer at a random height between the
configured lower and upper Cirrus
Altitude Range. The valid range of altitude settings are from
10,000ft up to 60,000ft (default range is 16,500ft to 45,000ft).
Low Overcast Effects come into force whenever the overcast cloud cover
is less than about 6000 feet AGL. You must be IN the Low Overcast Effect
to see it. Overcast by definition means 90% or more cloud coverage.
Don't expect to see solid blanket type overcast when looking vertically
downward ... you WILL see transparent holes just like you do in real
life until you get IN an OpusFSX Low Overcast Effect (an overcast below
6000 feet).
Disable
Fog and Mist effects if required. The mist and fog
effects place a thin layer of cloud on the mist/fog layer so that it is visible
from above.
In P3D simulator mode the Enable Volumetric Fog option is set
automatically using the VolumetricFog setting within the Prepar3D.CFG
file. If you change this setting during a P3D session then either change
the Enable Volumetric Fog Effect in OpusFSX to match P3D or restart OpusFSX. This option is ignored whenever the Microsoft FSX simulator type has
been selected.
The Reduce
Maximum Upper Visibility Limit option is for those users who prefer their upper visibility limits to be reduced a notch. The
visibility at altitude (28,000 feet) is reduced from the usual 128km to 96km
depending on the weather conditions.
Realistic reduced
visibility is an effect seen in the real world which we have simulated
for FSX. You may ignore
(disable) realistic reduced
visibility by configuring the distance as required, a value of zero
disables reduced visibility entirely.
The Default
Surface Visibility setting defaults to either 32km (20 miles) or
48km depending on latitude and time of year. The maximum visibility at
altitude is usually 128km (80 miles) and attained at or below a target
altitude of 28,000 feet. This maximum visibility can be reduced to 96km
(60 miles) whenever average surface visibility is reduced below some
predetermined distance depending on your Max Surface Visibility setting.
Of course when using
Dynamic Weather the visibility values in the METARs will override this
setting so it only comes into force when the METARs state CAVOK, 9999 or
10SM conditions.
Parameters
changed by the Automatic Settings
Setting
the Adjust Options Automatically
uses your specified Max Cruise
Altitude to set the weather related options, see the
table below. Dialog settings won't be updated until after the next weather
update. These options are different to the Default settings.
| Cruising Below 6000 feet |
Cruising Between 6000 and Below 12000 feet |
|
Cruising 22000 feet and Above |
|
| Weather Download Options | ||||
| Download GRIB Forecast Data | DISABLED |
ENABLED |
ENABLED |
ENABLED |
| Weather Download Options - Weather Update on Approach | ||||
| Disable on Approach | ENABLED |
ENABLED |
ENABLED |
ENABLED |
| Assume Cruising when Above | 1750 feet | 2000 feet | 2000 feet | 2000 feet |
| Disable Update when Below | 1500 feet | 1800 feet | 1800 feet | 1800 feet |
| Descent Disable Period | 30 minutes | 30 minutes | 30 minutes | 30
minutes |
| Smoothing and Stabilisation - High Altitude Wind Stabilisation | ||||
| Wind Stabilisation | DISABLED |
DISABLED |
ENABLED |
ENABLED |
| Automatic Wind Stabilisation | ENABLED |
ENABLED | ENABLED |
ENABLED |
| Enable Pressure/Temp Stabilisation | DISABLED |
DISABLED | DISABLED |
DISABLED |
| Recovery Altitude | 19000 feet |
If
Adjust
Sim Friendly Options is ticked in the Weather dialog
then, Cruise Altitude minus 2000 feet (minimum 5000 feet). Else, 19000 feet |
Cruise Altitude minus 4000 feet | 19000 feet |
| Forced Recovery | 12000
feet |
If
Adjust
Sim Friendly Options is ticked then, Cruise
Altitude
minus
2000 feet (minimum 5000 feet). |
Cruise Altitude minus 10000 feet | 12000 feet |
| Max Wind Change | 30 degrees | 30 degrees | 30 degrees | 30 degrees |
If
Adjust Sim Friendly Options
is ticked in the Weather dialog then the following weather related
options are always adjusted with any GRIB download,
Sim
Friendly GRIB Wind Targets = ENABLED
Sim
Friendly GRIB Temperature Targets = ENABLED
If
Use Maximum Stabilisation is
ticked in the Weather dialog then the following weather related options
are always adjusted with any GRIB download,
Enable
Pressure/Temperature Stabilisation = ENABLED
Max
Wind Change = 20 degrees
As an alternative to
the weather data collection over the Internet the software can be instructed to
import its METAR data from a user specified import file. The minimum Import
METAR File scan frequency is 5 seconds. Refer to the Weather Data Import
section for details.
Save
Current Weather as Static Theme
This dialog also
includes a Save Current Weather as Static
Theme button which can be used to save the current Dynamic Weather (or METAR
file import weather) as a named static theme. The theme covers an area of about
250km (160 miles) in each direction around your aircraft. You can choose to save
the theme with any name provided it is not prefixed with 'Opus'. Refer to the
Weather Data Import section for further details on loading the saved weather.
N.B. Take great care
not to overwrite one of the standard FSX/Prepar3D themes, the software will
query you if you select a theme that already exists, but will overwrite the
theme if you answer Yes to the query.
The use of static
weather themes is efficient and guarantees consistent weather and cloud
formations across all systems. Weather themes do not require the transfer of
METAR reports from the server to client systems.
To ensure correct
synchronization, the desired weather theme for the flight must be selected in
the FSXSERVER's Weather dialog, and not via the usual FSX Weather menu. The Enable
Live Weather Engine checkbox should be unchecked within the server
Configuration dialog, otherwise the static themes are grayed out in the Weather
dialog.
If at any time the
weather or cloud formations differ on your client machines, possibly due to you
manually pausing one or more of the simulators, this can happen as a result of
displaying an FSX dialog, then you can quickly resynchronize the weather by
displaying the Weather dialog on the FSXSERVER and clicking on the OK button to
reselect and reload (i.e. synchronize) the chosen weather theme. You may of
course choose to browse for a new weather theme and select that.
This procedure may also
be required after the client systems have first connected. For example, when you
have not prepared everything, including the weather theme, on the server system
before the client connections are made. In either case, the resynchronization is
almost instant.
If the Live Weather
Engine is disabled then no static theme will be loaded on start up when the User
Specified static weather theme option is set and the User
Specified Theme Filename is blank.
Recommended Settings and Practice
Upgrade to the latest Release or Beta Version.
Set all Defaults in all weather dialogs. *
Specify your Destination.
Specify your Max Cruise Altitude. **
Update the Weather. ***
Check the Weather ****
* This should enable the Adjust Options Automatically and the Adjust Sim Friendly
options in the Weather dialog.
** If you specify a Cruise Altitude of 6000 feet or more the LWE will download and process the GRIB forecast data from NOAA.
*** If GRIB data is downloaded then the Opus Upper Atmosphere Report will be automatically displayed showing the progress of your GRIB data download and processing. If you have specified
Background GRIB Processing in the Downloads dialog then the GRIB data extraction and lengthy decoding will proceed at a slower pace and can take several minutes. Otherwise the processing will be done as fast as possible at the expense of FSX performance or frame rates. The GRIB data is only downloaded once before flight and the decoded data will be valid all day or at least for nine hours so this is normally not a concern or problem. However, most users need GRIB data for flight planning and preparation.
**** Before flight you should get into the habit of checking the weather. At the very least display and check the Opus
Local, Lower, Upper, and Destination Weather reports. You may also like to examine the various Opus text reports accessed via the FSX Addon menu. There are separate reports showing the downloaded METARs, all the GRIB wind and temperature targets from 4000 feet up to FL540, all the en route weather for any specified flight plan including TAFs if you have enabled them, and finally an easy reference to all relevant SIDs and STARs. This report gives a handy direction and bearing for each listed SID and STAR.
The Opus weather reports (e.g. The Destination Weather) should be checked during climb and descent to monitor all wind and temperature targets, compared with the actual FSX ambient conditions. This way you will know that your sim is operating as expected.
Never disable weather updates, FSX will NOT cope on its own it simply cannot contain all the necessary data.
Test Weather Reports, located in the OpusFSX\Themes folder and accessed via the FSX Addon menu ...
OpusWeather.txt ... The downloaded METARs
OpusWeatherReport.txt ... The GRIB data report
OpusFlightReport.txt ... The flight plan en route weather report
OpusSIDSTARReport.txt ... The relevant SIDs and STARs
Live Weather Assistant (LWA) and Weather Map data ...
Surface QNH
Surface Winds
Surface Temperatures
Surface Visibility
Cruise Level Winds
Cruise Level Temperatures
Precipitation
Lower Level Cloud Cover
Met Station Cover
The LWA and up to six weather maps can be displayed on the server or a networked client.
Remember ...
You should use all the various Opus weather reports and text report files to check your weather before and during flight. Especially BEFORE you fly.
At the very least examine the Opus on-screen weather reports.
BEFORE flight ...
1. Check the Local weather report and confirm the weather has been injected OK.
2. Check the Lower Atmospheric weather report to confirm you have GRIB data downloaded and decoded. It will also show you what winds and temps to expect as the LWE takes you up to FL200 and the GRIB forecasted winds and temps.
3. Check the Upper Atmospheric weather report, again to confirm the GRIB data is downloaded and in use. This will also confirm the expected upper winds and temperatures.
4. Check your Destination weather report, if not within the current weather map then check the Destination report in the En Route weather reports. Then you will be warned of any adverse weather at your Destination.
5. If you have processed a flight plan then check the OpusFlightReport.txt file. You can access this via the Addon menu or directly, you will find it in your OpusFSX\Themes folder. The file content is self explanatory.
Other
Comments and Useful Hints ...
Both the Lower and Upper Atmospheric reports, and the
OpusWeatherReport.txt (GRIB Data) report file contain details of the
actual downloaded GRIB data cycle. In addition, each weather report
contains the METAR day and time code.
There should never be any need to question the validity of the
forecasted data. All the weather related information is available for
you to examine, as you should do before every flight.
The OpusWeatherReport.txt (GRIB Data) text report shows ALL the
forecasted and Opus 'Sim Friendly' adjusted upper wind and temperature
target data from FL040 upwards. All data from FL200 and above being
derived directly from the actual forecasted GRIB data.
Specify the altitude you are going to spend the most time cruising at in
the Max Cruise Altitude. If you set the Adjust Sim Friendly option
(Recommended to minimise weather updates amongst other things) then the
software will ensure the raw GRIB forecasted data is adjusted (sim
friendly adjustments) about this reference altitude. Of course the GRIB
forecast is only adjusted when needed at each 500 foot level. You can
see the results of this in the OpusWeatherReport.txt (GRIB Data) report
file and the Upper Atmosphere Report.
From release version 3.41 onwards, the vast majority of systems can now
safely use Non Sim Friendly GRIB Data if they wish but at the expense of
more frequent weather updates as you climb and descend. The choice is
yours but the GRIB text report file will show you the actual GRIB
forecast data for you to examine, including all raw (unaltered) GRIB
forecast data.
Helpful hint ...
If the upper winds, above FL200, all veer upwards above your lowest
stepped altitude then they will not be adjusted by the Sim Friendly
option. This option allows veering wind directions and increasing wind
strengths and only adjusts those that are backing (rotating anti
clockwise as you climb) upwards.
You can compare the adjusted and raw GRIB in both the text report file
and in the Upper weather report.
The actual GRIB data cycle is also identified. There is 360 hours (15
days) of global forecast data in each cycle. The cycles are never posted
on time as that identifies the time of the forecast cycle and not the
time of release. Cycles can in fact be posted anything up to 9 hours
after the cycle time.
There should be no need to force a weather update, the LWE will update
automatically to keep all the wind and temp targets appropriate to the
current altitude zone. It is usually best to leave the LWE to monitor
and adjust (you will need FSUIPC4 installed for this) the winds
dynamically.
Use the various on screen weather reports and the shift-Z info bar to
monitor your ambient conditions (wind) checking against the targeted
wind in the weather report for your altitude.
Start off using all Recommended Settings including the Adjust Sim
Friendly option. Get used to monitoring the targets against the current
ambient wind.
I usually position the weather report window immediately below the
shift-Z info line. I monitor the Lower report during the climb below
FL200 then switch to the Upper report as I continue to climb up to my
cruise altitude. Then I usually monitor the Destination weather report.
Never use accelerated time during the climb or descent, give your sim
and the Opus DWC the best possible chance to maintain its targets. In
the cruise if you must use accelerated time only use x2, x4 with
supervision. Not all aircraft sims are designed to work in accelerated
time.
The above weather checking and target monitoring will confirm that your
sim is performing as expected. The DWC on the vast majority of systems
will hold the winds within 2 degrees and 2 knots of the desired target
values. Remember DWC does require FSUIPC4.
Home About Us Products Downloads FAQ Gallery Testimonials Contact Links